Using Evernote for Meal Planning

This post is not about how to meal plan as such – it is about using some awesome little features in Evernote to make the process much easier.

If you have never done meal planning before, check out this link before you start here. It gives all the basics about meal planning, and will help you get an idea of what you are doing.

Last week on Tutorial Tuesday, I showed you how I organised my recipes in Evernote. Now I’m going to show you how I use those recipes to make up a comprehensive meal plan for the week.

What you’ll need:

  • Evernote program on computer (Mac or PC) – Please note that for this, you WILL need the computer program. The tablet/phone apps do not (in my experience) allow some of the actions we will be using in this tutorial, but once you have finished your meal plan you can use it on a tablet/phone.
  • Your recipes
  • A bit of free time

How to:

I’m assuming that you already have some sort of recipe archive in Evernote.

Step 1:
First thing you will need to do is make up a notebook called “Meal Plans” or something similar.Screen Shot 2015-02-02 at 11.07.22 am

Step 2:
Next, create a new note in “Meal Plans” and open it in a separate window next to your Evernote window.

Step 3:
Open your “Recipes” notebook in the main Evernote window, then set up your “Meal Plan” note as you would like it. I tend to do 3 sections – Dinners, Lunches, and Baking. You can use whatever headings you would like. NOTE: I don’t plan breakfast as such, as I tend to either forget to eat breakfast, or eat the same thing on the days I do remember (generally toast, unless I’ve made some muffins or something for breakfast).

 Step 4:
This is where you can “shop the specials”, if that is what you want to do.
Collect all your supermarket catalogues (for us, there are usually 3 of them) and look at what is on special. Write down the things that you are interested in and their cost in your “Meal Plan” note. These specials will help you pick what to cook.

Step 5:
Next, select the first recipe you want to add to one of your lists. Click and drag the recipe preview from the centre column (blue box) to your Meal Plan note. Release your mouse button when the cursor is in the location you want on the note and a little green “+” appears (the little green “+” was sitting just next to the recipe title, but it didn’t show up on the screenshot for some reason).

I chose this recipe because canned beans were on special, and I know that I have beef mince in my freezer and several of the other ingredients in my pantry. 

Step 6:
Repeat this until you have a full list to your liking. As you can see, I’ve added some recipes and some notes to my list – for example, I bulk-cook so on busy nights we eat meals that I’ve frozen previously. The green ones are the recipes – if you click on one of them, it will take you straight to that recipe! (This is one of the best things about meal planning in Evernote – no need to go searching for the recipe!)

Step 7:
Make your shopping list.
In the main Evernote window, open your Meal Plan note (still keeping the same note open beside it though).

Click on one of the recipes (green writing) in the main window and it will open the recipe. Now, you can compare what the recipe ingredients are to your specials list, and create a shopping list (I do this in the same Meal Plan note, so it’s all in the same place. If you prefer to use paper instead, that’s fine too).

I know that I have arborio rice, paprika, and frozen peas already in my pantry, so I don’t need to add these to my list 

Step 8:
Once you’re done with a recipe, there is a “Back” button in the top LH corner of the main window that will take you back to your previous note. Once you’re done with all the recipes, you can close the Meal Plan note, and your meal plan has been saved! For good measure (particularly if I’m going shopping straight away) I click on the little “refresh” button up the top of the main window to make sure the notes are synced to my phone/tablet.


Now your meal plan is all ready to go!

I generally put aside an hour or so on a Sunday evening to do this, because I do food shopping on Monday nights (Monday is pay day).

~K

Using Evernote as a recipe book

http://www.galleryleather.com/uploads/recipebook_glamour.jpg

There’s so many different ways of organising recipes that you collect from different places. You can cut them out and stick them into a pretty book, or write them in (this is my Mum’s preferred method). You can file them in some kind of folders, in whatever categories you want. Or, you can do it electronically!

There’s a thousand and one different “recipe book” apps and websites out there, and while I’m sure all of them are fantastic, they all have their limitations. Most of them, a free membership only allows you to add a certain number of recipes, then you have to pay a monthly fee to access them. If there’s an app, it might only be available on one device, which means that you’re limited to when and where you can do your meal planning and cooking.

So I use Evernote!

For this tutorial, I will not be explaining in detail how to do things in Evernote – I will say something like “create notebook”, but I will not elaborate much further (unless there is a slightly hidden feature you need to use), because otherwise I’d have to do a whole post just on that.

What you need

  • Evernote (this is the website, from here you should be able to find an appropriate download for your computer and devices)
  • A handful of recipes (to get started)
  • Some free time (Put aside an hour or two, depending on how fast you type)

How-To

  1. Download Evernote and install (if you haven’t got it already). To start with, just do it on your computer – that is what I will be using for this Tutorial. Open Evernote, and get yourself set up (if you aren’t already). You will need to create an account, but you can opt-out of getting emails from them, and the account is free. This account is how you will be able to access your recipes from anywhere, at any time.
  2. Down the left hand side there will be a menu – go to the Notebook view, and create a new notebook called “Recipes”Screen Shot 2015-01-02 at 9.40.03 am
  3. Double click on the Notebook to open it.
  4. At the top of the page you will see “+ New Note in Recipes”. Click this to add a new Recipe (or use keyboard shortcut ctrl+N for windows, ⌘+N for mac).Screen Shot 2015-01-02 at 9.45.22 am
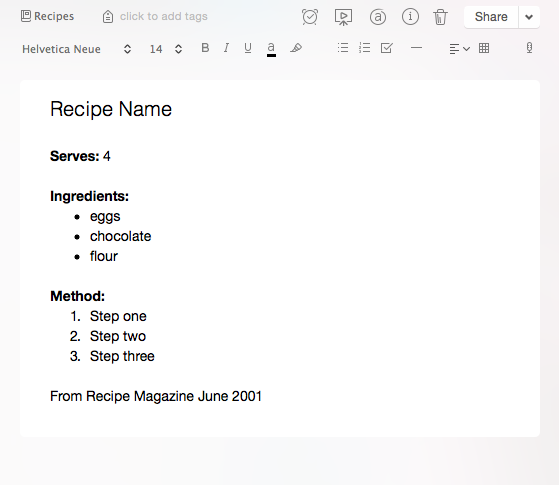
  5. Once your new recipe is open, set it up as you would like to. Shown below is how I set up a recipe card (all my recipes are set up exactly the same way, so it is easy to read).Screen Shot 2015-01-02 at 9.51.23 am
  6. If I own the recipe book, I set it up like this because why go to all the extra effort of copying out the steps when I can just grab the book out? I put the ingredient list in so I can use it for menu planning.Screen Shot 2015-01-02 at 9.53.17 am
  7. Then tag your recipes (up the top where it says “click to add tags”). I generally tag according to main ingredient (e.g. eggs, bacon, chocolate), meat used (chicken, beef, vegetarian), and number of serves (Serves 1, Serves 10, etc). I also have a “baking” tag, and I then tag those items further as “sweet” or “savoury”, and as “biscuits”, “muffins”, “cake”, or “slice”.
    A few other tags I use – I tag breakfast recipes as “breakfast” (but not lunch or dinner, because in our house those are interchangeable); If it’s something that is baked in a big pan and served from there (like pasta bake or lasagne) I’ll tag it as “bake”; Other similar cooking method tags or by food type, such as “stir fry”, “slow cooker”, “soup”, or “deep fry”
    Most recipes end up with between 4 and 8 tags. Use whatever tags work well for you and your cooking style.
    Tags are very important for meal planning (how I meal plan using Evernote will be another TT post).
  8. If your recipe is from a website and you have the web link, add it to your recipe using the little information button (an i with a circle around it) in the top row. This isn’t strictly necessary, but I think so many years of uni has gotten me in the habit of always referencing EVERYTHING. I find the web links come in handy for when I’m posting recipes from other blogs, because it’s easy to find the original blog post and give credit where it is due.

Feel free to add images if you want to, but keep in mind that pictures are BIG. Evernote has a limit on the total size of uploads, and also has a limit to the amount of data you can upload on a free membership (60MB per month). If you are only using text, you will likely never reach this limit, but if you are using pictures as well, you can get there pretty quickly.

If you want pictures, you can pay for “premium” membership for a month, upload all your stuff, then cancel the subscription (that’s what I did when I was setting up my recipes a couple of years ago). Premium costs about $5 for a month, and you get 4GB of uploads. You can still access everything once you’re back on the free membership, and as far as I’ve encountered there is no limit to the amount of cloud storage space – you can have as many recipes as you like saved there, and you don’t NEED to pay for premium membership to use them.

Please note that just taking a picture of your recipe and uploading that is fine – but you will not be able to search within the recipe, you’ll only be able to search the tags. I like being able to search within the recipe itself, as then I can do things like search for 3 ingredients I have in the cupboard and find recipes that contain those things. I use this a lot when I’m meal-planning, or when I have to cook with what I’ve got in the pantry.

~K

Evernote is available on just about every platform and mobile device, and for free. I am not getting anything from Evernote for this post.